

how to change dhcp lease time
- MiniTool >
- MiniTool News Center >
- 2 Ways – How to Change DHCP Lease Time Windows 10
2 Ways – How to Change DHCP Lease Time Windows 10 [MiniTool News]
By Tina | Follow | Last Updated
Summary :

What is DHCP lease time? How to change DHCP time Windows 10? This post from MiniTool will show these answers to these questions. In addition, you can visit MiniTool to find more Windows tips and solutions.
What Is DHCP Lease Time?
Internet Service Provider assigns your computer an IP address to lease. It is a dynamic IP address which has a particular time period. After the lease time is up, your computer chooses to renew or get a new IP address from DHCP server. This time period is called DHCP Lease Tim. In general, the default time is about 1440 minutes or 24 hours.
After 24 hours, the computer will renew the lease automatically and get a new IP address from the DHCP server. In this situation, some people would choose to change DHCP lease time Windows 10.
So, do you know how to change DHCP lease time Windows 10 or how to check the DHCP lease time on your computer? If not, keep on your reading to find solutions.
How to Check the DHCP Lease Time Windows 10
In this section, we will show you how to check the DHCP lease time Windows 10.
Now, here is the tutorial.
- Open Command Prompt.
- In the Command Line window, type the command ipconfig /all and hit Enter to continue.
- Then you can find the Lease Obtained and Lease Expired.
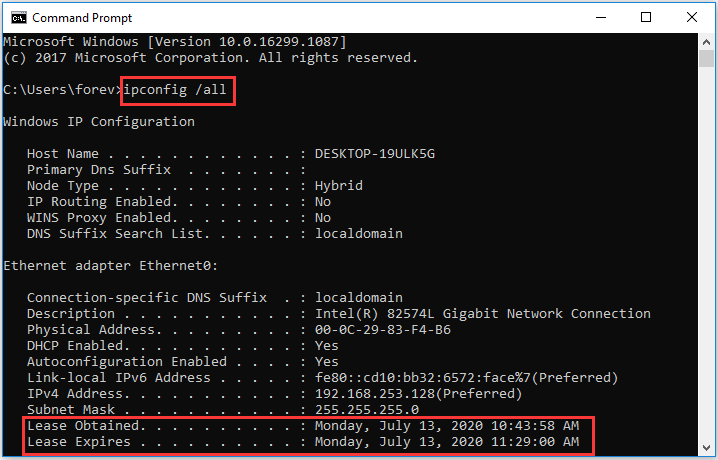
From the Command Line window, you can see the lease obtained and lease expires time.
After knowing how to check the DHCP lease time Windows 10. Do you know how to change DHCP lease time Windows 10.

What is DHCP not enabled for WiFi? How to fix the error that DHCP is not enabled for WiFi? This post shows you the solutions.
2 Ways – How to Change DHCP Lease Time Windows 10
In this section, we will show you how to change DHCP lease time Windows 10.
How to Change DHCP Lease Time Windows 10 – Router
First of all, we will show you how to change DHCP lease time Windows 10 via Router.
Now, here is the tutorial.
- Open a browser on your computer.
- Then enter the address of your router. In general, they would be 192.168.0.1 or 192.168.1.1. If you don't know the IP address of your computer, read the post: How to Find Your IP Address on Windows 10 S/10? (Four Ways).
- Then input the User ID and Password to access the router settings.
- In the Router Configuration page, find the LAN Then you will see the DHCP Server module.
- Next, you will see the DHCP Leased time. It is set 24 hours by default.
- Then you can change DHCP lease time to you want. Then click Save to continue.
After that, reboot your computer and the DHCP lease time of your computer has changed.
How to Change DHCP Lease Time Windows 10 – DHCP Server
Besides changing DHCP lease time Windows 10 via Router, you can also change DHCP Lease time Windows 10 via DHCP Server. Note that you can try this way only when you have a dedicated DHCP server to automatically assign IP addresses and other default network parameters. Now, here is the tutorial.
- Open Run dialog.
- Type dhcpmgmt.msc in the box and click OK to continue.
- Open the properties of the DHCP scope for which you want to change the lease time.
- Under the Lease duration for DHCP clients section, choose Generaltab.
- Then input a new lease time in the Limited tofield.
- Then click OK to save your changes.
When all steps are finished, reboot your computer and check whether the DHCP lease time is changed.
Final Words
To sum up, this post has shown what the DHCP lease time is and how to change DHCP lease time Windows 10 in 2 ways. If you want to change DHCP lease time Windows 10, you can try these ways. If you have any better ideas to change DHCP lease time, you can share it in the comment zone.
Scroll down for the next news Scroll down
how to change dhcp lease time
Source: https://www.minitool.com/news/how-to-change-dhcp-lease-time.html
Posted by: ruizresiduchathe.blogspot.com
0 Response to "how to change dhcp lease time"
Post a Comment